Storage Considerations
When explaining what we do at Carlton Plants to people outside of the nursery industry, I’m often met with dumb founded blank stare. “You mean to tell me you can dig a tree out of the ground with no soil, tie it in a bundle and put it in the refrigerator for several months, and it lives?” Well, there is a little more to it than that, but yes! In truth, the amount of detail that goes into storing plants would most likely take up this whole newsletter and many subsequent future editions. In an ideal world the plants would transition from our soil to yours with no time in between. The reality is that we do have to handle and store our plants for a certain amount of time. How we manage that can be critical to everyone’s success.
Loading and unloading bareroot products is a delicate process. Crews on both ends should be reminded to handle the products with extreme care. Being in a hurry can cause excessive breakage, bruising or scraping, which in turn leaves a cull tree or one more susceptible to disease entry. Some customers and drivers go as far as placing carpet on the back of the trailer so when the plants come off an elevated tractor-trailer to ground level they can slide down a soft carpet and avoid cosmetic injury.
As growers wait for the ground to be prepared, they are often times in the midst of their own harvest activities, digging, grading and shipping. This is the easiest time to forget about all those dollars sitting in the barns, sheds, cellars, mulching beds or cold storage facilities. This is the most critical time in the handling process. When storing indoors or outdoors, roots should not be exposed to temperatures below 28°. Take care to keep roots moist but also not to over water. Some genuses such as Amelanchier, Cornus, Cotinus, Gleditsia, Hydrangea and Syringa are very sensitive to wet storage. Daily monitoring of stored plants can be checked by physically grabbing the root systems with a bare hand and squeezing. No, water won’t come pouring out like a rung dishrag, but you can feel the moisture, rigidity and suppleness of the roots. Timely fungicide sprays both during storage and after planting can be critical. Consult your local chemical representative for recommendations.
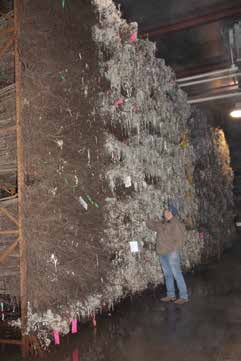
Species that need to be kept extra hydrated include; Crataegus, Gymnocladus, Pyrus, Populus, Liriodendron, Ulmus, Betula, Celtis, Carpinus caroliniana, Cercis, Styrax and Salix. Ways to retain hydration can vary. Some recommended suggestions include dipping roots with root gel prior to storage, mulching roots with sphagnum moss, clean, fresh straw, clean bark mulch, such as leached sawdust, shingle toe (a cedar shake by-product) or shredded paper. The key with storage is to be involved! Monitor temperature daily and take all action to avoid freeze damage as well as heat stress. Buildings with good insulation coincided with air circulation and moisture are important. Ideal storage conditions are generally 36º and 98% humidity in the air. Daily hand watering can be guided by colored ribbons placed on the select groups. Red for drier, green for extra moisture, yellow for moderate moisture. The colored flagging makes it easy to direct moisture needs at a glance. Storing in unrefrigerated buildings is suitable for shorter periods. Roots should be kept moist and mulched in with straw, shingle toe or paper and covered with a tarp. Temperatures should not go below 28°F.
Heal in beds are another great tool for bareroot plant storage. Depending on outside weather conditions, heel in beds are a great way to allow plants to naturally acclimate while holding dormancy. Of course, always be prepared for freezing temperatures. Typically, we will cover plants in the heal in beds or bring them inside if excessively cold temperatures are anticipated.
Another key to successful bed storage is the material you use. Mulch products that have not been properly composted or leached should be avoided. Some wood by-products contain tannic acids and Phenols that can be harmful to plants. Moist sawdust offers an ideal media for healing in. Plants should be healed in to the exact depth they were in the field. Pick a site that drains well or place drain tiles under and around the beds to remove excess water. Plants standing in water for a prolonged period of time is detrimental.
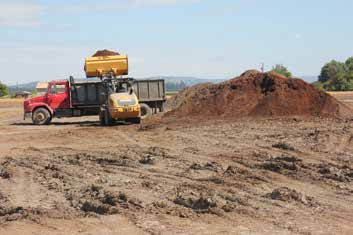
The next key to successful outside storage is rotating out that media every 5-7 years. After many years of continued use the media can start to break down and become detrimental to the plants. Rotting media can hold harmful bacteria and disease. Media that is too heavy or mixed with mud will become anaerobic and damage roots in a very short period. Changing this media is time consuming and somewhat costly, but it is such a key part of keeping plants healthy in holding beds outside.
Finally, plants should be watered in well at planting to eliminate air pockets and provide water to the roots. Plants that are shrink-wrapped or boxed should not be stored that way. They need air and moisture. Whatever your mode is for storing until planting, make a plan and monitor the plan. There is little time in the spring to prepare or plan for storage. Every plant matters in today’s market. Take time now to get ready for spring shipments.
If you have any specific questions about plant handling and storage please don’t hesitate to contact your field representative.
buzz…ABOUT BEE SWARMS
There are two main ways to establish a hive of honey bees. A great option for those just starting out in beekeeping is to purchase and install a 3-pound ‘package’ or a smaller ‘nuc’ of bees; alternatively, you can save a bit of money and capture a swarm (if you’re lucky enough to find one, that is).

A honey bee swarm occurs when around half of an existing colony leaves with the queen to establish a new hive in a different location. Swarming is completely natural, and is the standard method of colony reproduction in wild hives. Colonies that overwintered well and see steady growth during spring are most likely to swarm, typically during May and June. There’s an old beekeeper’s proverb that says, “A swarm in May is worth a load of hay; a swarm in June is worth a silver spoon; but a swarm in July is not worth a fly”.
Finding a wild swarm is like finding gold to a beekeeper. However, beware if your own established colonies begin to show signs of swarming! If you have an open hive or space available for the impending swarm, make sure it’s ready for them; otherwise, half of your colony may find a home somewhere else in nature—which is bad news for you, the beekeeper! Keep an eye out for larger, vertically-oriented swarm cells that appear on the bottom of frames. These cells house developing queens that will replace the old queen when she departs with half of the hive’s worker bees during the swarm. Multiple swarm cells will likely be present, but the first virgin queen to hatch will typically kill the others to avoid competition for the hive. If more than one virgin queen does emerge, ‘afterswarms’ may occur.
This is where each virgin queen after the first will also depart the hive with a collection of workers, further weakening the original colony. You can control swarming in your hives by clipping one wing of the old queen, alternating empty and capped frames above the brood nest, or keeping the brood nest open.
It is easiest to capture a swarm when the bees have clustered together around the queen. If the swarm is clustered on a low-hanging branch, place a white sheet under the cluster with a nuc box nearby on a sunny day. Spray the bees with a sugar-water solution until they are soaked, rendering them too heavy to fly away. Shake the branch vigorously to dislodge the main cluster and queen. The cluster will fall to the sheet and the bees will go to the first dark space available, which is your nuc box. After about fifteen minutes, most of the cluster will find its way to the nuc box and voila! You’ve captured a swarm.
Don’t be too worried about vigorously shaking a branch of bees either; bees are very docile during the swarming process. They have no resources to defend, and are more focused on staying with the queen. It’s even become a trend to make “bee beards” with swarms, where one can attach a queen to their chin and the swarm will follow, creating a beard-like effect with bees cascading down your body. It makes a great photo-op, but maybe not for the faint-hearted!
STRAIGHT TALK
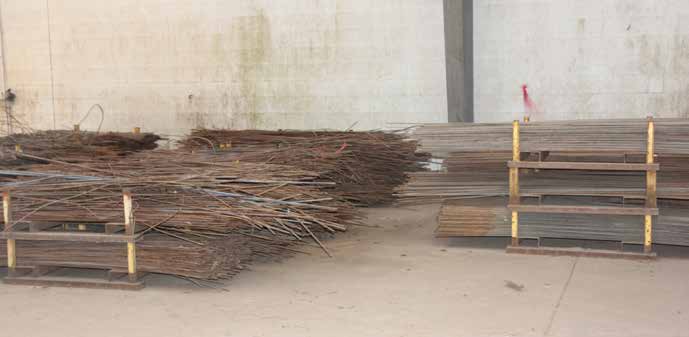
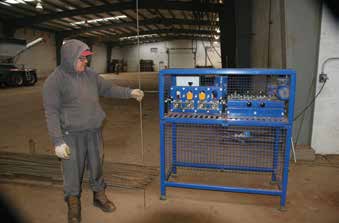
Over the past forty years, we have purchased over a million tree stakes of various caliper and lengths. Most of them have been made of galvanized metal for longevity. Although they are durable and useful for several decades, one thing that renders them useless is becoming bent. This may occur when undercutting, multi-row spraying, cultivating or when stakes are handled with a forklift. Slight bends or crooks can be straightened by hand using a short, small diameter pipe attached to a truck bumper. However, when it comes to multiple bends and many stakes, they usually end up at the scrap metal recycling yard. This can be costly, as the price of a 5/16” x 7’ stake has risen from $.37 in the 1980’s to $1.50 today; 3/8” x 10’ stakes now cost $3.00 each. With this in mind, we began a search for a mechanical stake straightener and found it through Midas Nursery Solutions. Lommers Nursery Automation in Holland manufactures the machine. Bent stakes feed through a guide and a series of chain driven wheels straighten out the kinks. There is aguide that corresponds to wheels with various sizechannels for 1/4”, 5/16” and 3/8” diameter stakes.They feed into one side bent and out the other a few seconds later, straight and ready to use again. There are numerous adjustments for both speed and tension, which we are in the process of fine-tuning. The work is not strenuous and can be handles by employees on “light duty”. The machine was not inexpensive but the cost recovery is rapid at a dollar plus per stake.